8.1.1
Once you have logged in to RTOmanager, click Offers>Apply Online
by Admin as shown in figure 8.1a.
��������������� 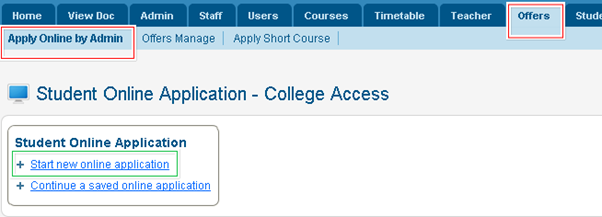
Figure 8.1a

�Continue a saved online
application link as shown in figure 8.1a will help you to continue with the
application in case if you exit from RTOmanager in the middle of the
application and need to continue later. You need to make sure that you have
saved your application before you exit.
8.1.2
Click +Start new online application as shown in green area in
figure 8.1a. Another rectangular box appears as shown by red area in figure
8.1b.
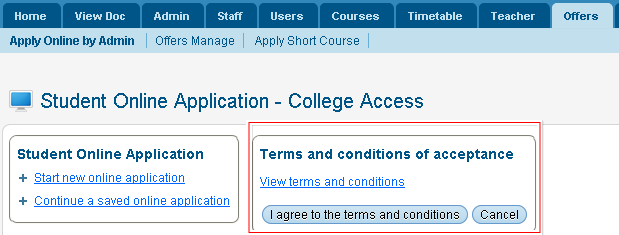
Figure 8.1b
8.1.3
Click  �to read terms and
conditions as shown in figure 8.1b.
�to read terms and
conditions as shown in figure 8.1b.
8.1.4
Click I agree to the terms and conditions button as shown in
figure above. This will take to the application step 1 page as shown in figure
8.1c
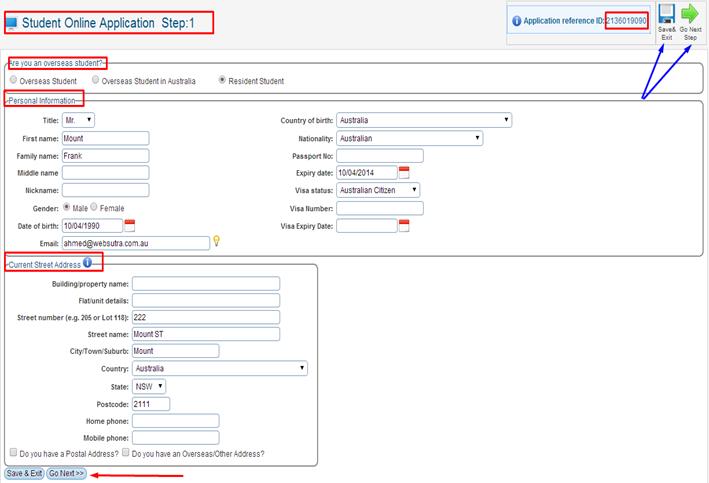
Figure 8.1c
Please note that the application
reference ID: 2136019090 as
shown in red area is the reference number given to your application which is
randomly generated and you need this later if you exit in the middle of the
application and again want to continue at your convenience.
8.1.5
Select Overseas Student in Australia (for onshore students or Overseas
student � if application is being made overseas or as per your requirement)
or (Resident Student � for local students living in Australia) as
shown in figure 8.1c.
8.1.6
In the Personal Information section, enter all the relevant
information of the student as shown in the figure 8.1c.
8.1.7
In the Current Street Address section, enter all information for
the street address as shown in the figure 8.1c.� Current Street Address is a
mandatory and will be set up as student mailing address but you may also enter
postal address details which will then set up the postal address as mailing
address
�You can also enter postal
address/Overseas address of the student if it is different from the street
address by ticking the check box as shown in figure 8.1c.
8.1.8
Click Save & Exit to save and discontinue the current
application or Click Go Next as shown in figure 8.1c. You will go to step
2 of application as in figure 8.1d
8.1.9
At this stage an email will automatically be sent (to entered email
address) which will notify the email address that an application has been
initiated in RTOmanager� and notify the application reference id.
Please note: There are
two Save & Exit / Go Next icons as marked in blue and red arrows in
above figure 8.1c. They both do the exact same thing, so there is no need to
worry which one you click on.
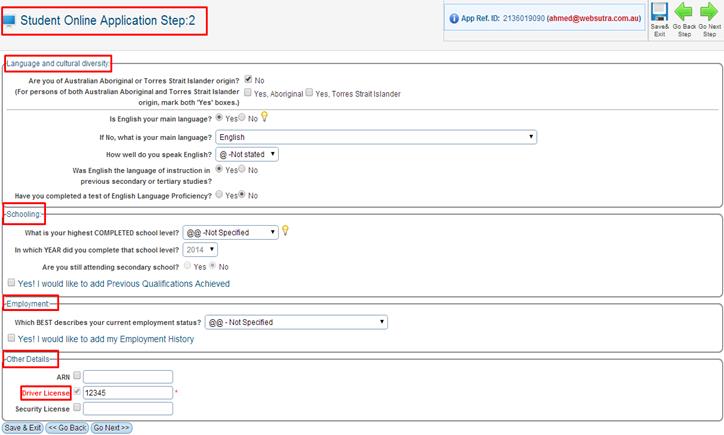
Figure 8.1d
8.1.10 In Language
& Cultural Diversity section, enter all the relevant information as
shown in figure 8.1d.
8.1.11 In Schooling
section, enter schooling information of the student as shown in figure 8.1d.
You may click yes I would like to add previous qualification achieved
check box to add previous qualifications obtained by the student.
8.1.12 In Employment
section, enter all the relevant information about the student�s previous and
current employment information as in figure 8.1d.
8.1.13 In Other
Details section, you can enter additional information e.g. ABN.
(Please refer to section �4.1.18 Additional Student Details�) to add
these other fields. Please note: the �Driver
License� is in RED which means it�s a compulsory field the others are not
but can be added if needed.
8.1.14 Click
Go Next to go to step 3 of the application as shown in figure 8.1e
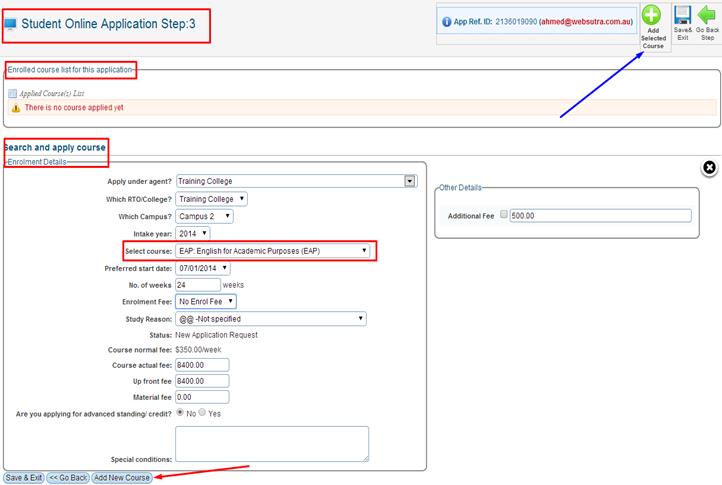
Figure 8.1e
8.1.15 In Enrolment
Details section, enter all the details of enrolment information as shown in
figure 8.1e.
8.1.16 In
�Select Course�as marked with a red box in above figure 8.1e, select
the course to add for the student from the drop down menu, this will auto
populate most of the other data fields such as No. of weeks, enrolment fee,
course actual fee etc.
8.1.17 Click
Add New Course button as shown by red arrow, also indicated by the blue
arrow in figures 8.1e. Your recently added course will be added in the list as
shown in figure 8.1f. Similarly you may add more than one course for the
student in case if the student has applied for a packaged course. Once course
is added you will see a pop up window mentioning course successfully added like
the one below in figure 8.1f. You will see the course you just added under the �applied
course list� as seen below in figure.
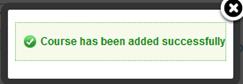

Figure 8.1f
8.1.18 Click
Go Next to move on to step 4 of the application as shown in figure 8.1g.
You can also delete the added course and view additional
fields by clicking on these  �icons as shown
above in figure 8.1f
�icons as shown
above in figure 8.1f
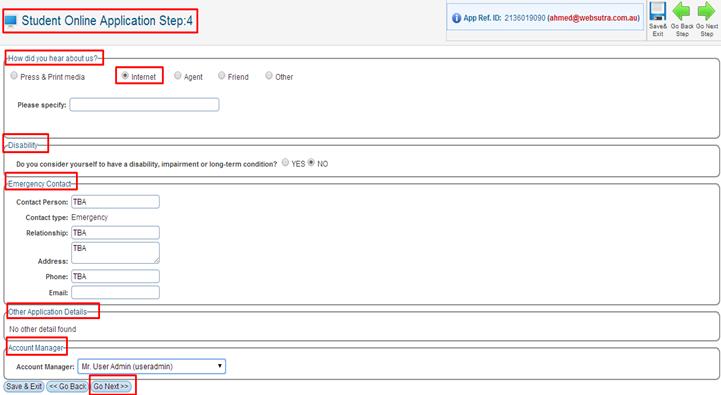
Figure 8.1g
8.1.19 In How
did you hear about us section, select the appropriate radio button for e.g.
Internet as shown in figure 8.1g.
8.1.20
In (Disability) section, select appropriate radio button. If you
select yes you will be further asked to supply disability information.
8.1.21
In Emergency Contact section, enter the emergency contact
information as shown in figure 8.1g.
8.1.22
In Account Manager section, you can select a manager from the
drop down list.
8.1.23 Click
Go Next as shown by red highlighted box in figure 8.1g to go to the Preview
Page as shown in figure 8.1h.
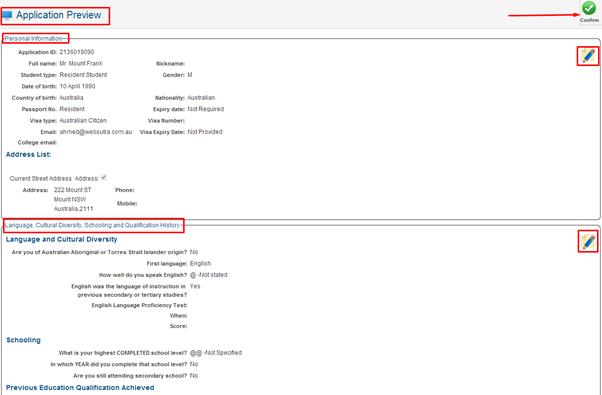
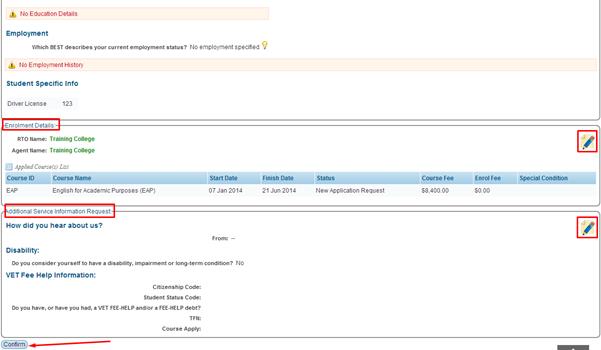
Figure 8.1h
8.1.24 You can
edit each section (personal information, schooling, enrolment details etc) by
clicking  �icons at the right
hand side of the preview page as highlighted in red box shown in figure 8.1h.
�icons at the right
hand side of the preview page as highlighted in red box shown in figure 8.1h.
8.1.25 Click
Confirm as indicated by the red arrows in the above figure 8.1h if you
think all the information you supplied is correct. You will go to step5 (final
step) of application to upload student�s document as shown in figure 8.1i.
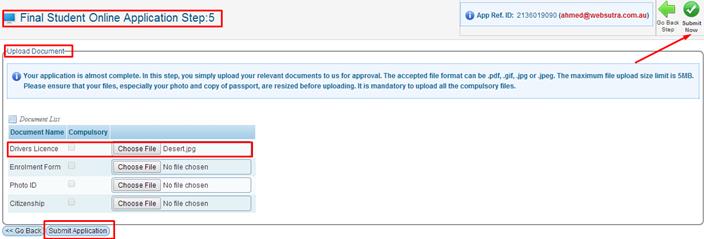
Figure 8.1i
You will only be asked to upload student�s documents as per
the parameter set in Offer Document Checklist setup.� Please
refer to Admin Manual, Admin>Offer Document Checklist to
understand and setup this parameter (Please make
sure that you have already set this parameter before using RTOmanager).
You have option to set up the document checklist for 3 student�s origin which
is: Overseas Student, Overseas Student in Australia and Resident Student.
8.1.26 Click
 �button or
the
�button or
the  �icon as shown above
in figure 8.1i. Your application will be submitted and you will go to another
page as shown in figure 8.1j. Offer Reference number is displayed and a
successfully lodged application message will appear as shown below in figure
8.1j
�icon as shown above
in figure 8.1i. Your application will be submitted and you will go to another
page as shown in figure 8.1j. Offer Reference number is displayed and a
successfully lodged application message will appear as shown below in figure
8.1j

Figure 8.1j
�


