14.1.7 Generate Agent Receipt
To generate Agent Receipt, follow the instructions below:
14.1.7.1����� Go to the student payment summary page
of the student of interest as shown in figure 14.1.7a.
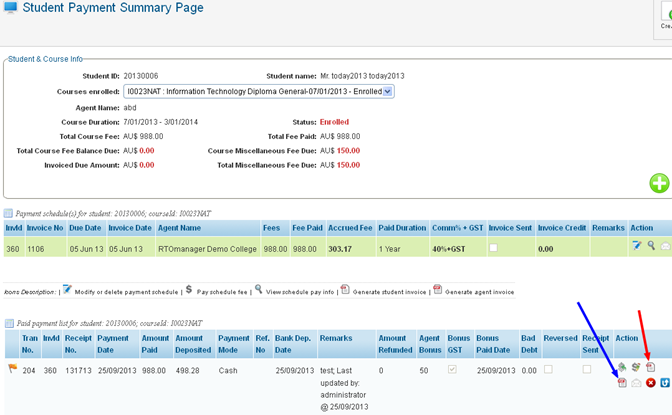
Figure 14.1.7a
14.1.7.2����� Click
 icon
(Generate Agent Receipt) in the payment section as indicated by blue arrow in
figure 14.1.7a. A Save as dialogue box will prompt you to save the Agent
Receipt. (Click icon
for the relevant payment in figure 14.1.7a for which you want to generate the
agent receipt) icon
(Generate Agent Receipt) in the payment section as indicated by blue arrow in
figure 14.1.7a. A Save as dialogue box will prompt you to save the Agent
Receipt. (Click icon
for the relevant payment in figure 14.1.7a for which you want to generate the
agent receipt)

You can also link multiple paid transactions on a single �Receipt�
by simply making sure the paid transaction have the same �Receipt No�. You
can simply click on the  �icon as highlighted
in red box shown below in figure 14.1.7b �icon as highlighted
in red box shown below in figure 14.1.7b

Figure 14.1.7b
A window will pop up as seen below in figure 14.1.7c. If a
receipt already exists simply select �New Receipt� from the drop down
menu as highlighted below Receipt No:. This will allow you to enter in a
receipt number or can link with existing one if more than one payment
transaction exists.
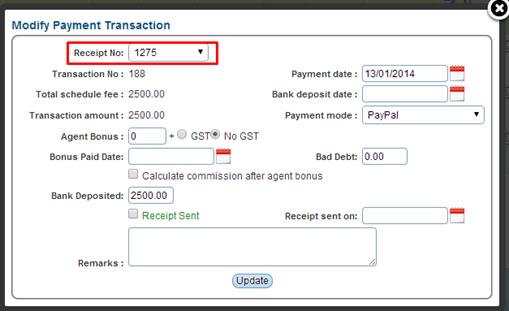
14.1.7c
| 


