14.1.1 Initial Payment (Creating Schedule &
Processing Payment)
From this menu you can process the upfront fee paid by the
student and also create payment schedule for future payments. To understand
these, follow the instructions below:
14.1.1.1 Once
you have logged in to RTOmanager, click Accounts>Student Payment as
shown in figure below. You will go to the page as shown in figure 14.1.1a.

Figure 14.1.1a
14.1.1.2
Enter student ID whose payment you want to process for e.g. 20140003 as
shown by red box in figure 14.1.1a.
Tips: You may
also enter student first name, last name in the search criteria in figure
14.1.1a to find your student when you do not know the ID of the student.
14.1.1.3
Click . .

Figure 14.1.1b
14.1.1.3
Click  icon
in figure 14.1.1b. You will go to Student Payment Summary Page as shown
in figure 14.1.1c. icon
in figure 14.1.1b. You will go to Student Payment Summary Page as shown
in figure 14.1.1c.
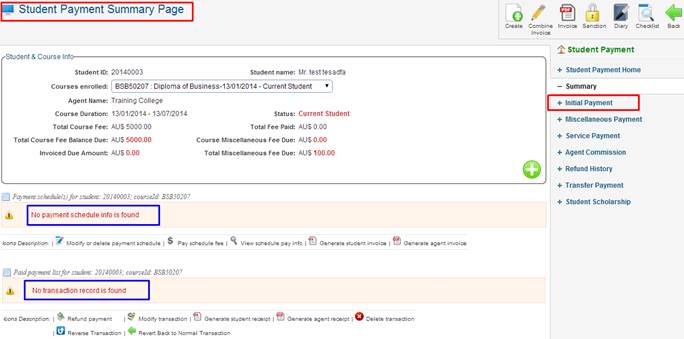
Figure 14.1.1c

Please note that the student has not made any payments up till now
since the total fee paid is 0. Figure 14.1.1c displays the student payment
summary.
14.1.1.4 To
start processing payment, click Initial Payment as marked by red circle
in figure 14.1.1c. You will go to student initial payment page as shown
in figure 14.1.1d. By default initial payment with schedule is selected
in the drop down menu as marked by red circle in figure 14.1.1d.
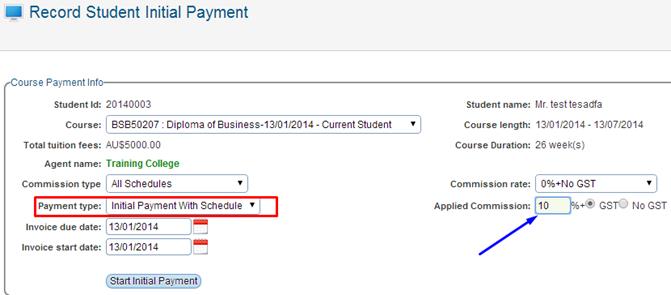
Figure 14.1.1d
14.1.1.5
Select/enter course, Commission type (once off, all schedules,
first two schedules etc), Payment Type, Invoice due date, invoice start date,
commission rate for which you want to process the payment as shown by the blue
arrow in figure 14.1.1d.
In figure 14.1.1d, commission type refers to how and
on what basis commission is payable to the agent and can be setup for
individual student case. Commission rate is the % rate that the college
has agreed to pay the agent. Payment type refers to the way you receive
payments from the student.
14.1.1.6
Click  �in
figure 14.1.1d. You will go to the student initial payment page as shown
in figure 14.1.1e �in
figure 14.1.1d. You will go to the student initial payment page as shown
in figure 14.1.1e
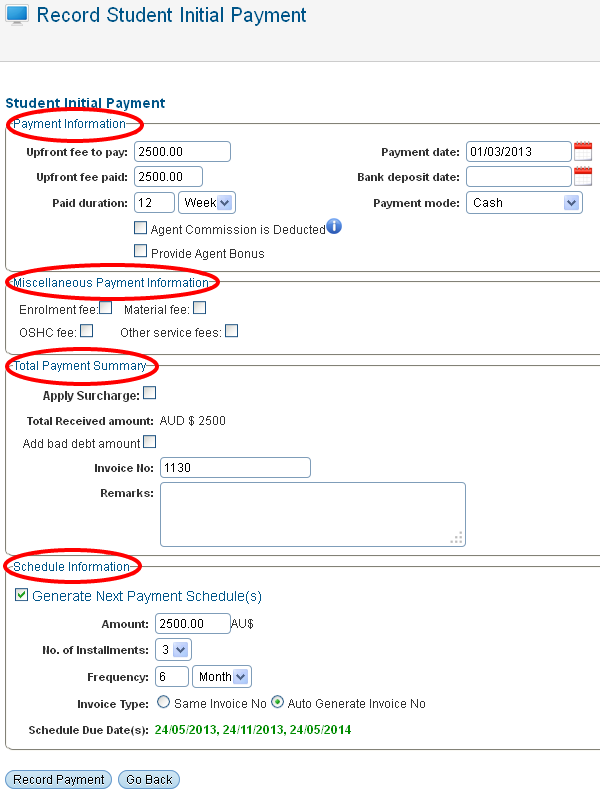
Figure 14.1.1e
14.1.1.12
Enter/select all the necessary information as shown in figure 14.1.1e.
�
In Payment Information section up-front fee to pay
refers to the portion of fee student is required to pay initially. You can also
manually change this field. Here the upfront fee is picked up from the Student
course upfront fee as set up by the staff during the student offer application.
If the upfront fee is showing 0 then it may be because no set up of upfront fee
has been done for the course in the Student Course while setting up offer
details.� Bank deposit date refers to the date when the fee is actually
deposited in the bank account. Amount in section Schedule Information
refers to the balance amount after upfront fee (in section
Payment Information) paid by the student. This field is used for bank
reconciliation later. No of instalments in section Schedule
Information refers to the period that you allow your student to pay the fee
due (Figure 14.1.1e). Frequency refers to the duration of each
instalment. If you choose Invoice Type as same invoice No then the
system will create same invoice no for all the schedules whereas will create
invoice no automatically (unique) when you choose Auto Generate Invoice No.
14.1.1.13
Finally, click . You will be prompted with a pop up
confirmation screen like below in figure 14.1.1f. This allows you to make
your final adjustments if needed before clicking on �Confirm Schedule�. Do Note the Amount; Due & Start dates and
Agent Commission are auto populated prior when first recording the Student
Initial Payment mentioned above. However this section as shown in figure
14.1.1f will allow you to edit the fields as seen below. Lastly click on �Confirm
Schedule� . You will be prompted with a pop up
confirmation screen like below in figure 14.1.1f. This allows you to make
your final adjustments if needed before clicking on �Confirm Schedule�. Do Note the Amount; Due & Start dates and
Agent Commission are auto populated prior when first recording the Student
Initial Payment mentioned above. However this section as shown in figure
14.1.1f will allow you to edit the fields as seen below. Lastly click on �Confirm
Schedule�
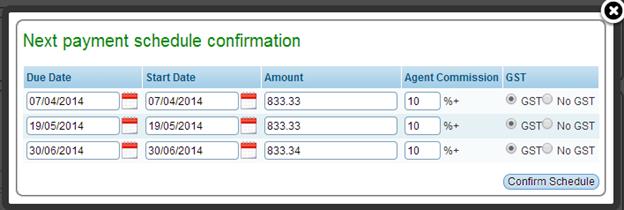
Figure 14.1.1f
Your payment will be recorded and you will go to the student
payment summary page as shown in figure 14.1.1g.

Figure 14.1.1g
In the figure 14.1.1g, observe that payment schedules are
marked by red box and their respective payments are marked by blue box. Paid
payment with transaction No 188 is actually the payment of the
first payment schedule with Invoice ID 506 in figure 14.1.1g. Also
observe that the paid transaction appears with a blue flag  �and
the payment schedule will be highlighted in green as shown above. You can also
view respective payments made for a particular schedule by clicking �and
the payment schedule will be highlighted in green as shown above. You can also
view respective payments made for a particular schedule by clicking  icon
in figure 14.1.1f. icon
in figure 14.1.1f.
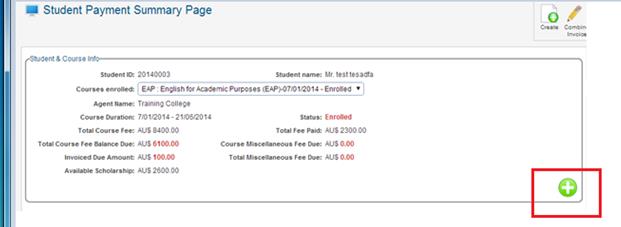
Figure 14.1.1h
This icon when
clicked as seen above in figure 14.1.1h, will show you the students Subjects
Enrolment Info as seen below in figure 14.1.1i. when
clicked as seen above in figure 14.1.1h, will show you the students Subjects
Enrolment Info as seen below in figure 14.1.1i.
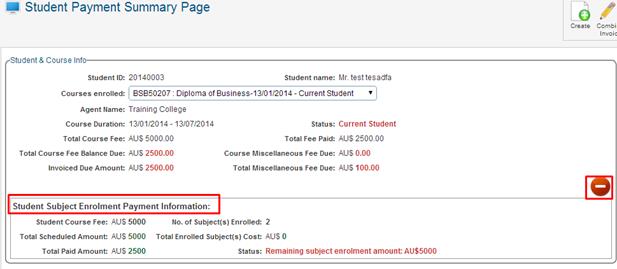
Figure 14.1.1i
Tip: If you would like
to generate all the payment schedule as one �Schedule Invoice� make sure
each payment schedule has the same Invoice No. To edit this click the icon as
highlighted in red box below in figure 14.1.1j

Figure 14.1.1j
A pop up window will open up, simply enter the correct
invoice number and click on update as shown below in figure 14.1.1k
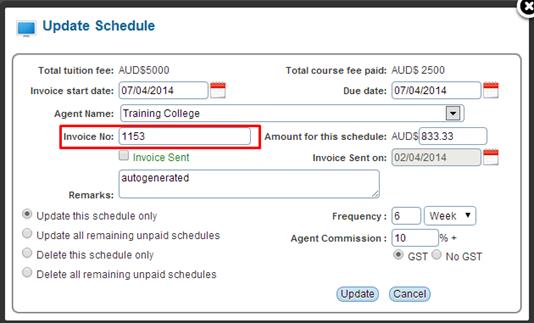
Figure 14.1.1k
| 


